

The Work Triangle: A Starting Point, Not a Finish Line
For decades, kitchen designers have used the work triangle as a foundational planning tool. The concept is simple: draw a line connecting your refrigerator, sink, and range, and you get a triangle. The shorter and more balanced that triangle, the fewer steps you take during meal preparation.
Traditional guidelines suggest each leg of the triangle should fall between 4 and 9 feet, with a total perimeter of no more than 26 feet. Kitchens that stretch these distances force cooks to walk unnecessarily; kitchens that compress them create crowding.
That said, the work triangle is a starting point - not a rigid requirement. Many contemporary kitchens have two cooks, a dedicated coffee station, or a range with a separate wall oven. In these cases, designers often shift toward work zones instead: overlapping activity areas that can be optimized independently. Think of the triangle as the core idea and zone planning as its practical evolution.
Test Your Triangle Before You Commit
Before finalizing any layout plan, walk through a mock version of your daily cooking routine in the existing or proposed space. Use painter's tape on the floor to mark appliance positions and countertop edges. This low-cost simulation often reveals crowding or inefficient step patterns that look fine on a floor plan but feel wrong in practice.
Zone Planning: Organizing Your Kitchen by Activity
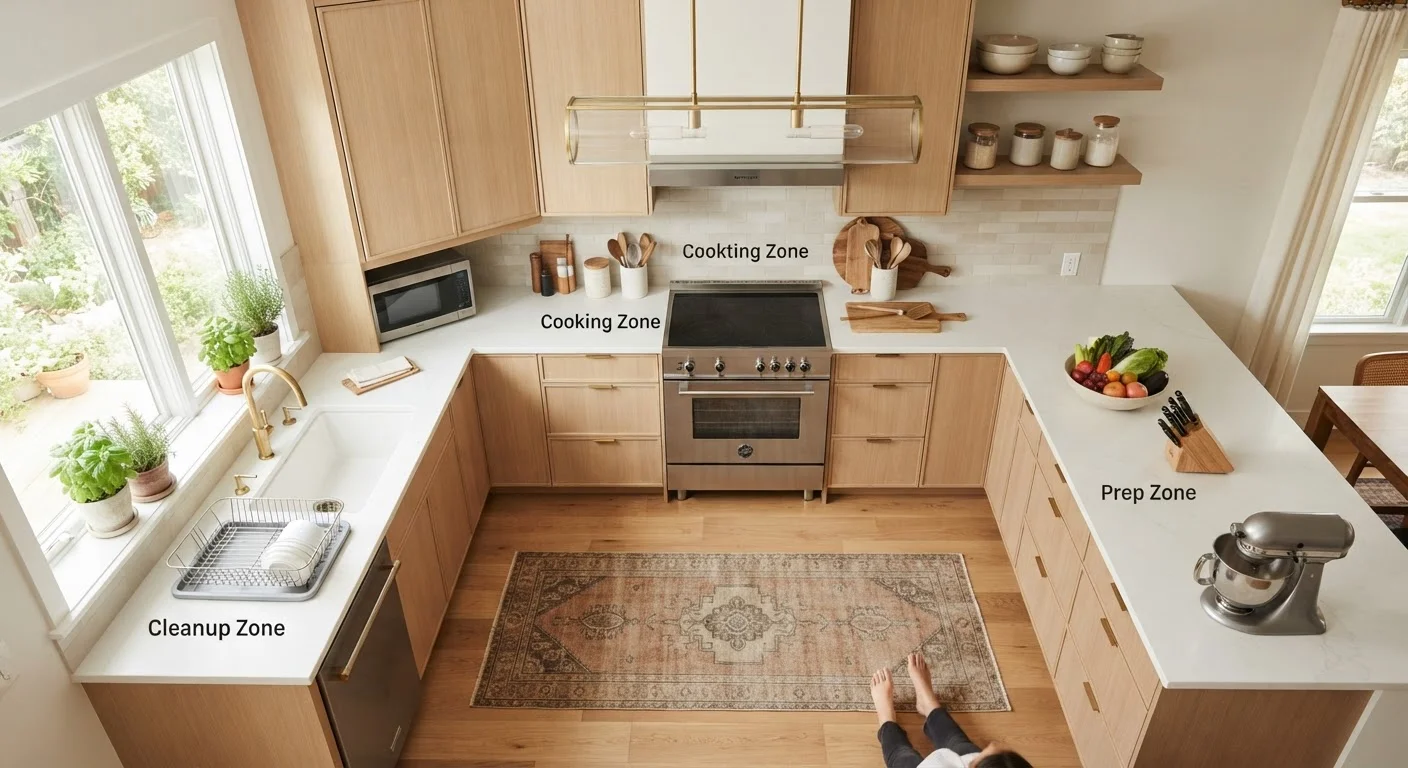
Zone planning breaks a kitchen into distinct functional areas so that each activity - prep, cooking, cleanup, and storage - has a dedicated home. When zones are well-placed, family members can move through the kitchen without constantly crossing each other's paths.
- Prep zone: Ideally a clear stretch of countertop near the sink, with easy access to knives, cutting boards, and frequently used ingredients. Many designers recommend at least 36 inches of uninterrupted counter space here.
- Cooking zone: Centers on the range or cooktop. Landing space on both sides of the stove - at least 12 inches on one side, 15 on the other - is critical for safely setting down hot pans.
- Cleanup zone: Built around the sink and dishwasher. Positioning these near each other (with the dishwasher to the left of the sink for right-handed users, or right for left-handed users) reduces dripping and awkward reaching.
- Storage zone: Pantry cabinets and the refrigerator grouped near the kitchen entrance keep grocery unloading efficient and non-cooking family members out of the work area.
42"
Minimum corridor clearance for one cook
The National Kitchen and Bath Association recommends at least 42 inches of clear floor space in single-cook work corridors, and 48 inches when two cooks share the kitchen.
36"
Recommended uninterrupted prep counter length
Kitchen design guidelines commonly cite 36 continuous inches of countertop as a baseline for a functional prep zone, particularly adjacent to the sink.
When you're planning a renovation, sketch each zone on your floor plan before choosing cabinets. Zone conflicts - like a pantry that forces someone to walk through the cooking zone to reach the fridge - are easier to solve on paper than after installation.
Traffic Flow and Clearances: Where Many Kitchens Go Wrong
Even a beautifully designed kitchen becomes frustrating when people constantly bump into each other or block appliance doors. Traffic flow planning addresses how people move through the kitchen, not just within it.
The NKBA's published guidelines offer a practical baseline: maintain at least 42 inches of floor clearance in work corridors for one cook, and 48 inches for two. Dishwasher doors, oven doors, and refrigerator doors all swing open into this space - so measure with those extensions in mind, not just the closed appliance footprint.
If your kitchen is also a passthrough between rooms, consider placing the island or peninsula so that foot traffic flows around the perimeter rather than straight through the cooking zone. This single adjustment can dramatically reduce interference during busy meal times.
For homeowners thinking about removing walls to improve flow, it's worth understanding what that work actually involves. See our guide to open-plan living for a clear breakdown of structural, electrical, and permit considerations before making that decision.
Layout Shapes: Matching the Floor Plan to How You Cook
The overall shape of your kitchen - galley, L-shape, U-shape, or island-equipped - has a bigger effect on daily function than any single appliance or finish choice. Each shape suits different room sizes and cooking habits.
Layout Changes Often Require Permits
Relocating a sink, stove, or refrigerator typically involves moving plumbing, gas lines, or electrical circuits - work that usually requires permits and licensed tradespeople in most US jurisdictions. Always check with your local building department before beginning layout changes that go beyond cosmetic updates. Unpermitted work can complicate home sales and insurance claims.
- Galley
- Two parallel walls of cabinets with a corridor between them. Highly efficient for one cook; can feel tight for two. Works well in narrow spaces where an L or U layout isn't possible.
- L-Shape
- Two adjacent walls forming a corner. Naturally creates a work triangle and leaves one or two walls open for dining or living areas. A flexible choice for small to medium kitchens.
- U-Shape
- Three walls of cabinets wrapping around the cook. Maximizes storage and counter space; keeps the work triangle compact. Works best in rooms at least 8 feet wide to maintain proper clearances.
- Island Kitchen
- Adds a freestanding or attached structure in the center of an L or U layout. Ideal for extra prep space, seating, or storage - but only when perimeter clearances of at least 42 inches are maintained on all sides.
Whichever shape your space allows, prioritize function over style at the planning stage. Finishes can be updated; moving plumbing and gas lines is a much bigger undertaking.
Frequently Asked Questions
The work triangle connects the three most-used points - sink, stove, and refrigerator - with imaginary lines. The concept remains useful as a starting reference, but modern kitchens with multiple cooks or islands often adapt it into overlapping work zones instead. It's a helpful guideline, not a strict rule.
The NKBA recommends at least 42 inches of clear floor space between parallel counters for a single cook, and 48 inches when two cooks share the space. Less than 36 inches makes movement feel cramped and creates safety hazards near hot appliances.
A galley layout - two parallel runs of cabinets - is often the most efficient use of a narrow kitchen because it keeps all work zones within a few steps of each other. An L-shape is another strong option for small to medium rooms, especially when one wall opens to a dining area.
Not necessarily. An island improves workflow when there is at least 42 inches of clearance on all walkable sides, and when it adds landing space or storage that the perimeter cabinets cannot provide. In a tight kitchen, an island can actually create bottlenecks rather than solve them.
Placing the refrigerator close to the kitchen entrance makes it easier for family members to grab items without crossing through the cooking zone. It also keeps traffic away from hot surfaces - an important safety consideration, especially in households with children.
Permits are typically required when moving plumbing, gas lines, or electrical panels - all common in layout changes. Requirements vary by municipality, so always check with your local building department before starting. Working without required permits can affect home insurance and resale.
The content on this site is for informational purposes only and is not a substitute for professional advice. Always consult a qualified professional for guidance specific to your situation.